
This blog entry concerns itself with the mechanics of obtaining the best scan from any machine, flatbed or dedicated film scanner.
It is not meant to be the ultimate scan guide, but is just the method I use that gives me what I feel are good results.
Scan software
Whether you use the software that came with your scanner or an after-market solution like Ed Hamricks Vuescan which supports a wide range of scanners here are a few tips.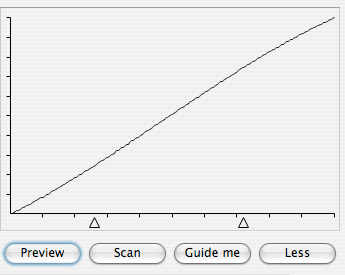
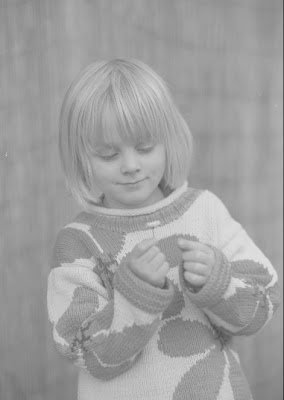 Getting the info from the film into the file.
Normally this means scanning with little correction, just getting the whitest point a very light grey and the darkest point almost black it also helps if you scan as 16 bit greyscale as when the time comes to edit the file we need as much info as possible.
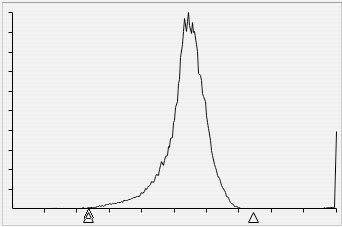
The important thing here is to preserve as much information as you can from the film and the resulting histogram will look similar to this.
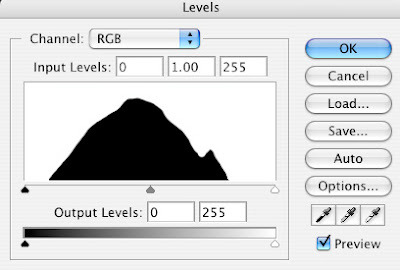
Above is the levels dialogue, which shows the values in the image as a histogram, that is as if the values have been 'piled up' like bricks.
The most common tones are the highest spikes, but what we are looking for here is the values to be placed in the centre, with nothing 'clipping' from either end.
At the left hand side is the black point and the right is the white, the centre is the grey point which changes the density.
Normally we pull the two extreme ends towards the centre thus setting the black point and the white point.
The image above is exaggerated but what I look for is no clipping of white or black values or from the top of the 'hump' I find this gives a good compromise between clipping info and maximizing the tones in the final image.
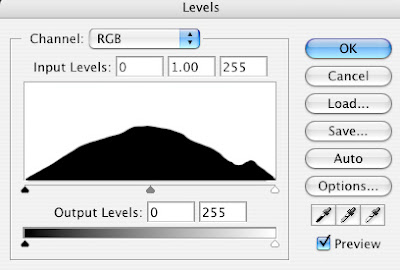
Once you have set these three points the flat looking file we started with will now start to look as we envisioned.
The Histogram will now look flatter and wider and if we scanned in 16bit should have no info missing with its tell tale 'comb' effect on the histogram.
 This should be the effect on the image, a slightly punchier result with black and white tones in the places they should be
Even though our scan now looks a lot better our next step will consolidate and hopefully add a little 'snap' without clipping too much info.
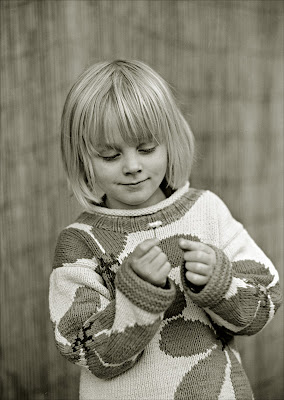
 Final 'tweeking' including spotting and final sharpening and in the finished shot below the application of a warm tone duotone created in photoshop to give a chlorobromide paper effect
Scan software
Whether you use the software that came with your scanner or an after-market solution like Ed Hamricks Vuescan which supports a wide range of scanners here are a few tips.
The settings in your scan software will vary but what you should look for is a dialogue a little like this one:

This is the curves dialogue and should look like a 45° slope with the black and white points away from the centre (the small triangles at the bottom) Below is the same scan but with a histogram.
Note the setting of the black and white points as not to clip the histogram.In other words set the black and white points near but not touching the histogram. Most scanner software even gives a preview and we are looking for a flat image like this one:

Note the setting of the black and white points as not to clip the histogram.In other words set the black and white points near but not touching the histogram. Most scanner software even gives a preview and we are looking for a flat image like this one:
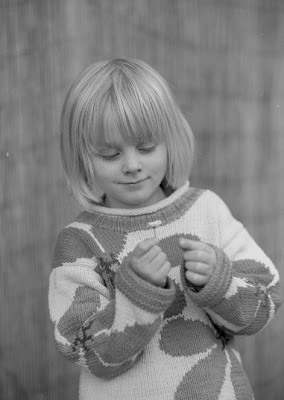
 Getting the info from the film into the file.
Normally this means scanning with little correction, just getting the whitest point a very light grey and the darkest point almost black it also helps if you scan as 16 bit greyscale as when the time comes to edit the file we need as much info as possible.
The important thing here is to preserve as much information as you can from the film and the resulting histogram will look similar to this.

Above is the levels dialogue, which shows the values in the image as a histogram, that is as if the values have been 'piled up' like bricks.
The most common tones are the highest spikes, but what we are looking for here is the values to be placed in the centre, with nothing 'clipping' from either end.
At the left hand side is the black point and the right is the white, the centre is the grey point which changes the density.
Normally we pull the two extreme ends towards the centre thus setting the black point and the white point.
The image above is exaggerated but what I look for is no clipping of white or black values or from the top of the 'hump' I find this gives a good compromise between clipping info and maximizing the tones in the final image.
Once you have set these three points the flat looking file we started with will now start to look as we envisioned.
The Histogram will now look flatter and wider and if we scanned in 16bit should have no info missing with its tell tale 'comb' effect on the histogram.
 This should be the effect on the image, a slightly punchier result with black and white tones in the places they should be
Even though our scan now looks a lot better our next step will consolidate and hopefully add a little 'snap' without clipping too much info.
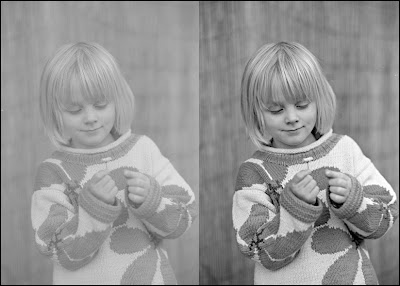
What I have found is that applying the unsharp mask tool in Photoshop with a high Radius setting and a low amount setting–say amount 30 Radius 60 (although these will vary from image to image) will give a contrast sharpen with pleasing results.
This makes our flat looking image a little more 'dynamic' looking without having to resort to the ordinary contrast tool which is a lot coarser in its action.
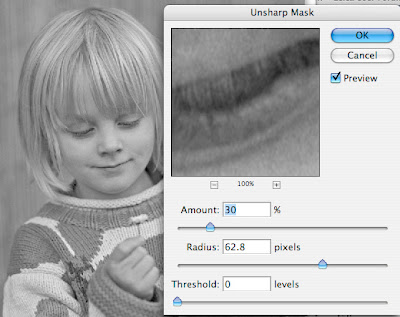

The original image is side by side for comparison
 Final 'tweeking' including spotting and final sharpening and in the finished shot below the application of a warm tone duotone created in photoshop to give a chlorobromide paper effect
© Mark Antony Smith 2008