Friday, January 28, 2011

Found Film — 127 Kodacolor VR200


First a confession, I was given this film about 5 years ago, promptly put it in a draw and forgot about it.
It is a Kodak VR200 in 127 format dating from somewhere between 1982-90. I think the Kodak VR range were the first to use the T grain type emulsions, and were superseded by the Gold range in the late 1980's
Often people who find old colour films decide to process in B&W as either the process is no longer available or they think the colours will have faded anyhow.
As I have been processing my own C41 I decided there would be no harm loading up the old film, and as you can see by the following images they aren't too bad considering the film was loose wound and at least 20 years since exposure.
This looks familiar, probably East coast-possibly Sheringham or Cromer


It looks like a bed and breakfast holiday on the East Anglian coast, probably taken with a folding camera. 

© Photo Utopia 2011

Thursday, January 20, 2011

Processing Your First Colour Negative Film


Its not as hard as you think!
In these days of ever shrinking film market we often find ourselves looking for a good photographic lab for colour work which can sometimes be hard. So if you can't find one why not have a go yourself? There are some excellent kits now available from Tetenal, Rollei and Fuji-Hunt.


 Quite a few of you will already be processing your own B&W so already own  most of the equipment needed.
Hold on I hear you say-isn't colour processing complicated?

Processing colour negative film is as easy as B&W in fact in a lot of ways it is easier. The equipment you need for C41 negative is exactly the same as B&W with the exception of the thermometer which will need to go up to 40°C.
As the development time is the same for all C41 films 3 mins and 15 seconds the only hard part is keeping the developer at the standard 37.8°C ± 0.2°C
My method for keeping the developer is to use a water bath which I heat with a cheap fish tank heater which keeps the solution at the required temperature.
I use a 1L C41 kit which has three baths, Developer, Bleach/fix and Stabiliser (final rinse)


Here is my method:
I place the developer bleach-fix and stabiliser in the plastic washtub which I then fill with warm water at about 35°-40°C (around 100°F) I then switch on the tropical fish tank heater which maintains the temperature.


Then load the tank as you normally would with B&W film.


The chemicals need time to come up to temperature and stabilise, so put your thermometer in the developer bottle and keep an eye on it, the C41 developer is rated at 37.8°C (100°F) but half a degree either side won't matter.
Once up to temp, fill a clean container with water at 38-39°C this water will be used for  pre-soaking the film, which will help to keep the developer up to temperature by warming the tank and ensure the developer goes evenly over the film.
I pre-soak for two mins and while I do this I get ready my timer ( a watch with second hand is fine) and a pen and paper to note the passing time.


Pour out the pre soak water (it will be a coloured liquid, which is normal) and slowly pour in your developer (should take 15 seconds) and start your timer and initial agitation of about 15 seconds-tap the tank to dislodge bubbles.


Important Note: It is easier to use the agitation stick with some models like the Patteson System 4 you can keep the thermometer in the tank by placing in the centre of thestick. If you use inversion method after the initial agitation the air inside expands so you'll need to crack off the lid to let the warm air out-or risk leaks!


Keep an eye on the time as agitation should be every 15 seconds either by 2 inversions or twists of the agitation stick. During this time I prepare another jug of water at 35°-39°C which I use as a non standard wash to prolong bleach life.
The developer time for fresh solution is 3 minutes 15 seconds, so after the 3 min time take off the lid and slowly pour your developer back into the holding bottle(a funnel can help here), then put in my previously prepared first wash (you can use acid stop bath) which should be at the same  temperature (within a degree or two) as your processing solutions.


Agitate the wash/stop for 15-30 seconds then empty. Next pour in your Bleach-fix which should be over 35°C (as close to you developer temperature as possible) and agitate for a full minute then tap.
Remember to release the air if you use the lid and inversion


Prepare another jug of wash water at least 35°C.
Further agitations at 30 second intervals until the 6 min bleaching time is completed (you can't really over bleach-fix.
When finished pour the bleach into its holding tank and pour in your warm wash water and agitate for 1 minute, pour out the wash then re-fill with another warm wash and repeat until you've done this step five times.
Next pour in your stabiliser-don't agitate! just leave for one minute before taking out your film and hanging to dry.
N.B The stabiliser is the final bath, no further washes or wetting agents should be used.


That's it you're done! I actually find it easier than B&W, give it a go practice on cheap film/test shots until you're confident, but colour is nothing to worry about.
Here is an image developed from a Tetenal kit:


Notes:
Developer is the most critical step, keep the temperature as close to the target 38°C as you can. Developer times should be extended by 15 second after every 5 films, a 1L kit should do 12-15 films.
If you process a lot of 400-1600 films take the lower figure of 12 as they exhaust the developer faster-you kit should have more information.
 Quite a few of these kits say "for rotary processors' but can quite easily be used for normal tanks as long as agitation is given every 10-15 seconds (not all commercial processors have constant agitation)
Developer changes colour from honey-gold to pinkish brown this is normal, in well sealed bottles should last 4-6 weeks its main enemy is air.
Keep developer away from all other chemicals especially bleach if you contaminate the developer with bleach-discard it (follow your countries laws about disposal)
Bleach likes air just before use, in fact commercial labs pump air though the bleach to condition it- I shake my bottle before use to get air in the solution.
Extend the bleach time to 10mins after you've processed 10 films.
Stabiliser will go from clear to pink during use-this is normal.


©Photo Utopia 2011

Wednesday, January 05, 2011

Ensign Ful-Vue


The Ensign Ful-Vue is an English box camera manufactured by Houghton-Butcher. Early pre-war versions were simply a box with a larger than normal viewfinder. The copmpany re-designed the camera in 1946 giving it an 'aerodynamic' look which still looks quirky today. The version above is from about 1950 and is a Ful-Vue II with a flash socket just to the right of the lens.

The body is made of pressed steel making the camera robust but quite light, the viewfinder is a separate unit also made of pressed steel. The shutter housing is made of a Bakelite type material held on by three screws making shutter and lens removal easy (more later)
The left hand side has a locking knob which when twisted to 'unlock allows the right hand side panel to be removed for film loading/retrieval.

Inside is a baffle and film holder, the Ful-Vue takes standard commonly available 120 film and has a red window for viewing frame advance.
All simple stuff, one shutter speed and aperture mean little control coupled with a simple lens that has three position scale focus 2, 5-3 and 6 to ∞ (I'm assuming feet).

My camera when it arrived had what I call a 'lazy shutter' in other words it had an intermittent non firing, but armed with some help from a Flickr member 'Full-Vue' I was able to take apart and clean the shutter.
After cleaning and re-assembly the shutter works fine, I didn't lubricate the simple mechanism I just gave it a polish.
In the winter in the UK with a box camera you really need a 400ISO film as I'm betting the shutter is about 1/60 and the lens probably f8 or 11.


The above was shot on a very dull cold day on Fortepan 400 developed for 1hr in Rodinal 1:100 stand.
I like the camera for its 'quirkyness' and simplicity, the big viewfinder looks great almost like a TLR in size and brightness, and for the times when you want a simple box with a lens-fun!


©2011 Photo Utopia

Monday, December 06, 2010

In Praise of Rodinal (Part 1)


History 
Rodinal in one form or another has been available to photographers for over a century. Originally produced by Agfa it can now be found in many different guises Adox/Calbe/Foma RO9 all basically now the same developer.
In fact Rodinal has become a bit of a cult developer, some even make their own using Paracetamol


 Rodinal is one of my favourite developers, it is compensating when mixed in larger dilutions like 1:50 or 1:100 this also makes it very economical and to cap that it seems to last forever without going off in its undiluted state.
(although this is only true with undiluted solutions, once diluted I'd personally use the mix within the hour).


While most other developers are useless when they go a dark straw colour, Rodinal remains useable regardless of colour – I have used the stuff when it was black, just take a look at the picture at the top of this article.
I can find no difference in developer activity between new bottles and ones where the solution is the same colour as Cola!


I first used Rodinal in the early 1980's when I worked with a photographer who demonstrated its qualities on a roll of APX developed at 1:50 shot on his 1950's Rolleicord.
At the time I thought he was quite mad as he decanted the tiny amount of black liquid from what looked to be an old brown glass medicine bottle with rubber stopper.
His results were wonderful, with a long range of tones and very sharp, it wasn't long before I had purchased my own bottle (though it came in a plastic bottle)


Rodinal apart from lasting longer than most photographers life spans, also has the advantage of being very economical as it can be used highly diluted 1:50 (1 part concentrate to 50 water) being my favourite; but anywhere between 1:25-1:200 can be used as long as you don't use less than 10ml of concentrate according to Agfa guidelines.
In reality those are pretty conservitive and I use 5ml as my minimum, and this seems to work well as my developer tank needs 500ml for a 120 film so the maths isn't too hard.

Above is the classic combination of APX developed in Rodinal 1:50

Recently the producers of Rodinal have lost the right to the name as a trademark, I have it on good authority that it is produced in the same factory in Germany but is now known as R09 'one shot' the new label seems to state it quite clearly:

Produced as Rodinal for Connect Chemicals (ringed in red) for any that harbour doubts. In  part 2 I'll give some more examples of Rodinal in practical use as well as possibly showing some tests of how it differs from other developers, results from pushing film, and why I feel it makes a good choice for stand development.


© Photo Utopia 2010

Friday, November 26, 2010

Found Film: 1970's Ilford FP4

Every so often I'm given a little photographic archaeology project, films that have been left in cameras or draws, for over 60 years in some cases!
The film I've been given this month is a roll of 120 Ilford FP4.
The film is still in production as FP4+ but this roll probably comes from the early production 1970-79 from the packaging.

What developer to use always inportant with old films and I favour Rodinal or HC110 as they give lower base fog which tends to be worse with films that have been stored for many years.
I processed this film in Rodinal 1:50 (10ml concentrate in 500ml water) for 15 mins with agitation of one inversion per min. 

The film had about five 2¼ square images, two of which were of a boys hockey team at the local park the rest of someones back garden.
Looking at the  hair, clothes and the fashion I'd guess these were taken between 1974-76 which means they have been sitting waiting for processing for 35 years.
The camera was probably a folding type as the images were left to right along the film.
I'm guessing the camera owner was probably the guy lying down in the second shot.
I wonder why people leave these undeveloped?

© Photo Utopia 2010


Monday, November 22, 2010

Filmwasters

The Filmwasters are a group of individuals who share a passion for all things film. They have forums, both audio and video podcasts, print exchanges etc.I'm a member of the forum myself, and can attest that they are a friendly bunch who have a wide range of photographic interests from toy cameras, Polaroids alternative process etc.

Take a look at the Filmwasters

Tuesday, November 16, 2010

Scanning with the Epson V500

Scanning film with an Epson Flatbed

Like most film photographers I need to scan my images in order to post them on forums or to my Flickr account.
This tutorial centres around getting good quality output from a very cheap consumer scanner the Epson V500. There are better scanners but for web display and even small prints from medium format its a pretty good scanner.
I'm also going to scan with the free software that comes with the scanner,keeping it as simple as possible.
Firstly set the software to work in 'Professional mode' this ensures you have control over the important settings. I use the software though Photoshop TWAIN module so images jump into PS after scanning– it can also be used as a stand alone program.
The important settings are set out below:


I feel the most important settings are:
Scan in 48bit (24 if your image editor only works to lower bit depth)
Resolution at 1200 gives output that can be used either for small (up to 8") prints or web images. At time of writing I feel that 1200 is the most useful setting for scanning as 2400 doesn't yeild much better images but increases scan times.
Set the original and destination (output) athe the same values–this should be the default.
In the adjustments section I disable unsharp mask and gran reduction as I prefer to do manipulation in Photoshop.

After you have made your pescan a viewing box opens, at this point the scan often looks sub-optimal so the first thing I do is highlight the image area I wish to scan.

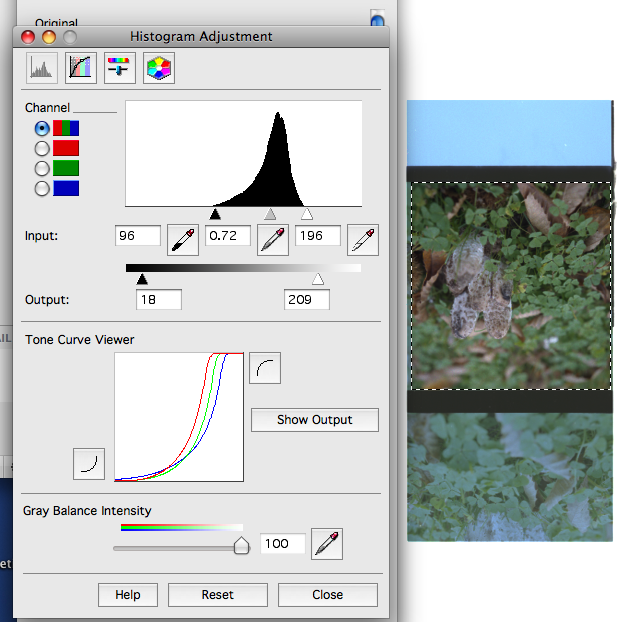
Next I hit the histogram adjustment button which is the second one in the adjustments pallete:

This brings up another pallete which looks like this:


Notice The histogram window at the top? That represents the tones in the pre-scan scan, if you look carefully you'll see the white triange (lightest tones) has a little information  to the right. In other words it 'clips' the highlight tone and if you look at the actual image you'll see actual image shows the clipping as missing or 'blown' highlight detail.

To remedy this you take the white triangle and move it to the extreme right of the histogram info, like this:


The whole image looks dull, but the upside is that most of the info will now be scanned. If you hit the 'show output' button you will see a histogram of the final image that will be imported into Photoshop.
From there you can make all the adjustments, levels, colour, sharpening etc

This tutorial isn't supposed to be scanning 101 just a guide to what works for me, trying to set the black and white points to avoid clipping and doing most post in PSCS.
The finished image can be seen at the top of this post.

© Photo Utopia 2010

Wednesday, November 10, 2010

Found Film Photographers

I've decided to do a regular feature on photographers whose work I like or admire who still use film.
One of the most often asked questions is why do you still use film-isn't everyone using digital?
That seems to be the perception, which of course is quite wrong, there are many photographers using film because of its unique qualities– I hope to find a few gems to share.

First up to the plate is David Richardson who came to my attention though his Flickr page.
He is based in London, England and has what I would describe as a retro glamour style.
I asked him about his Photography, here is a short interview:

Photo Utopia: Why shoot film?
David Richardson: "I started shooting film for an exhibition I was part of. The theme was travelling light, so I got photos of a friend semi naked on the metropolitan line. After that I used digital a bit more for shoots I was doing but there was always a significant difference in the quality between them. In the end I wished some photos I'd already taken were film. So I didn't want to compromise in the future"


PU: What are your favourite film stock/s?
DR:"I shoot mostly portraiture so Kodak Portra NC is my favourite choice. But sometimes other films offer something different. I used ancient 25 year old film for the band Kap Bambino as I wanted a grungy aesthetic. Tri-x is gorgeous and I love using natural light and grain so I go for iso 800 films when I can".

PU:What photographer do you admire most?
DR: "I am a massive fan of Bob Richardson and Anders Petersen are my favorites. I am also very into Nick Waplington. But it changes from day to day".

PU:How long have you been shooting film?
DR: "Well my girlfriend at the time got me a Yashica T5 at a flea market in Amsterdam around Xmas 2008. I still love that camera, it's a toughie!

PU:What are your future plans?
DR "I wanted to sort out an exhibition and get an agent and I guess keep going on and enjoying. I'm in the middle of editting my first music video on super 8. So more of that too"


Thank You David.


Here is a link to David's impressive Flickr gallery.

Link To David Richardson on Flckr

Wednesday, November 03, 2010

Autumn Colours


These are just a few images taken during October with my Rolleiflex 3,5F some with the Rolleinar 2 close-up lens (a must for Rolleiflex/cord owners) The above chestnut leaves were taken on Kodak 400 VC


This 'Fly Agaric' was taken under a tree with very little light hand held at 1/15 sec on Kodak 400 VC film

This tree shot was taken on a very dull day on Fuji 800z film. The following shot is of the same tree taken just a day later with Fuji 400H.


And finally English Apples taken on Fuji Superia 400


Words and images  © Photo Utopia 2010


Saturday, September 25, 2010

Book Review: Making Kodak Film– by Robert L. Shanebrook

I don't normally review books, so please excuse my awkwardness but I feel this particular book is very important because it is as far as I know unique.


If you're reading this blog chances are just like me you're still using the odd roll of film or two, and if you're slightly geeky about it you've probably wondered about how that roll came into existence.
If so this book will certainly answer any questions as it covers film production from the manufacture of the base, the emulsion and perforating and slitting and packaging.
The book is clearly presented and very well written with over 150 photographs and illustrations showing the machinery and production methods at every stage.
The book itself is a soft-back about A4 size the paper and printing is very good quality.

I liked the images of the silver ingots showing them being put into the Nitric acid and also the confectioning machinery showing how films were perforated or this case the image below rolled with paper backing for 120.


(image of the book showing 120 film slitting and confectioning)

The author Robert L. Shanebrook worked at Kodak for 35 years and must have spent quite a lot of time putting together this book, the photography is excellent as is the annotation and overall layout.
In fact I can't think of I'd criticise, the book is an invaluable reference for anyone interested in film.
If you'd like a copy of this book it's only available from the author at his website:
http://www.makingkodakfilm.com/

So all in all a quite wonderful book and I have enjoyed it immensely. It is a fantastic reference which I think Kodak should give to every member of their sales team especially customer support.

© Text Mark Antony and images Robert L. Shanebrook.

Friday, September 24, 2010

New Fujifilm Medium Format Camera


Fuji Has just announced that it plans to release a new medium format camera. The camera is called the GF670W and has a wide angle 55mm Æ’:4,5 Fujinon lens and has the capability to shoot 6x6 or 6x7 it also accepts both 120 and 220 film.


The shutter is a leaf type that has speeds 4-1/500 sec + B, features aperture priority as well as manual exposure modes and has an ISO range 25-3200.


Its not everyday a new film camera is released and after the sucess of their GF670 folding camera (known as the Voightlander Bessa outside Japan) it proves Fuji is committed to the medium.

Wednesday, September 15, 2010

Kodak announces new Portra 400 film


Kodak Have recently introduced a new 400 ISO film to their Portra range here is what their blurb:


"The new PORTRA 400 is the world’s finest grain high-speed color negative film. At true ISO 400 speed, this film delivers spectacular skin tones plus exceptional color saturation over a wide range of lighting conditions"


The film actually replaces both existing 400 speed films in the Portra range Portra 400NC and 400VC and colour saturation wise falls between those two films, the grain is supposed to be finer than it's predecessors so obviously incorporates the technologies from their Vision movie films.
I think if this film lives up to Kodak's promises it should have a colour saturation similar to Fuji NPH only with slightly finer grain, which will make it a very competitive product.
Like most photographers I see this as a consolidation, the loss of NC and VC will be less of an issue to those who work in a hybrid workflow, and if it helps Kodak to keep turning out better and better products albeit in a smaller range-that's Ok by me.
Portra 400 should be available in November, as soon as I can get my hands on a sample I'll do one of my mini reviews to see if the claims made by Kodak are substantiated.
Here is the Kodak web Page:

© Mark Antony 2010

Friday, July 30, 2010

Human Rangefinder

As you probably know at this blog we occaisionally use old folding cameras like the Zeiss Ikon and Ensign Selfix.
The biggest problem with these cameras is that some of them just have albada viewfinders, that is there is no focusing aid such as a rangefinder.
I'd like to share with you a great tool that allows you to make a custom RF just by placing some details into field on a webpage.
This generates a PDF which you can print, cut out and store in your camera case(I laminated mine too).
Here is the link.
http://tomchuk.com/rf_hfd/index.php

Here is how mine looks for my Ensign

It works by holding the card at arms length and opening your left eye and lining up a vertical with the '0' line, close the left and look though your right, note the number that the vertical line now passes through–that's your distance.
I'd like to thank Thomas Achtemichuk for this great tool!

Sunday, July 25, 2010

Film is Expensive?

Film
An often repeated claim I hear goes like this: I don't use film anymore as the whole thing has become too expensive, or some incredulously saying 'do they still make film'?
I'm finding quite the opposite, firstly consumer colour film is far cheaper now than it was when I first started photography in the 1970's
This Week-End just for fun (and my upcoming holiday) I decided to take out £10 and see how many rolls of film that small sum of money could buy.
First stop was Boots the chemist, a British High Street chain whose photographic departments often have minlabs as well as a small stock of film.
I noticed on the shelf they have their own brand 200 36exp 5 packs for £8.49 and Fuji 200-24 for a little less.
They also sell slide film and Ilford B&W and a few single use recyclable cameras although they don't publicise this on their website (c'mon guys).
This particular shop had some short dated Fuji 'Holiday Pack' for £1.99 for 5 rolls I bought all they had which was 2 packs (10 rolls) at a total of £3.98 not bad...

Next a short trip to Poundland which unsurprisingly has a ticket of a pound for any item. Here I found Kodak 200-24 and their own single use recyclable cameras each (drum-roll) £1
My price cap for the afternoon was £10 so I bought 5 rolls of the Kodak giving me change of £1.02 which I used for the car park-15 rolls of film for less than £10.
My haul can be seen in the picture at the top of the post.

Processing
On the High St there is still quite a lot of choice regarding processing most chemists and supermarkets offer processing from as little as 99p up to about £5.00 or so depending on the service I have the 99p develop only which has been fine quality wise apart from the cutting into 4s
Prolabs have become much more thin on the ground, generally they use dip and dunk machines that take longer to process a roll and cut into 6's develop only can range £3-5 this becomes pricey if you need to post them.
I use a cheap minilab for 35mm and pay £2 for them they cut them in 6s and do a nice job.

Cameras
The choice here is huge, the rush to digital means yesterdays consumer compact is mostly worthless, recently I have purchased a Pentax Espio zoom 35mm compact for 50p! I have seen Canon sureshots Olympus trips and the like for 5-£10.
Lower end SLR of 10-20 years ago like Zenith and Praktica can be had for similar money, while mid tier SLRs like the Yashica FXD, Fujica STX 1n and Ricoh KR 10 can be found for £20.

The cheaper first tier cameras include the excellent Olympus OM1 and Canon EOS 650 of which I've seen many examples under £50, lots of choice with very high quality.
Modern AF cameras like the Nikon F100 and Canon EOS 1 can be found for a few hundred and make excellent occasional film use bodies for those with digital equivalents.

So film can be relatively in-expensive and should be though as a pay as you go model, especially if you don't shoot many images and enjoy just shooting and forgetting only to re-find that image 6 months later.
A camera like an Olympus OM1 will deliver great images for many years and gets a 'sensor' upgrade every time a new film comes out, something like a film compact can be slung in your cars glove-box taken to the beach and can be cheaper that a single use camera.

Thursday, July 22, 2010

Fun with POP

Printing out paper or POP as it is often reffered to has been around since the 1880's and is one of the first gelatin based photographic papers.
POP has a very slow photographic speed, that is you need quite a lot of light to make an image, so much so that it can be handled for short periods under indoor lighting.
The normal method for printing an image is to put the paper into a printing frame (I used a photo frame) and contact print negatives by placing them on the paper so they are sandwiched between the glass and paper–this keeps them nice and flat.

What you see above is all the equipment you need to make a print, the only extra things you'll need are a tray of water and sunlight.
Firstly in subdued light place the negative into the frame and lay the POP emulsion side down against the neg, then snap the back of the frame in to hold the paper agaist the negative–you may even like to put some card packing in to hold the negative against the paper.


I am using a 4x5 negative in order to give a good image size, negatives can be made from any image by inverting B&W images in photoshop and printing on transparent film

The next step is to place the frame outside in sunlight, I have found that a bright slightly overcast day gives the best results, trial and error being the best method of exposure, my times are normally between 5-15min the shorter time would be in bright light the later in open shade.

You can tell when the exposure is nearing completion as the area that was paper white begins to turn a plummy brown.

When taken from the framethe tones can be anything between yellow-red to purple-brown, and in this state the photograph isn't stable, that is bright light will fog it.

In order to 'develop' the print it must first be briefly washed to remove the excess silver nitrate which gives the image a better stabilty, and also causes the image to turn yellow/red and become slightly lighter.


The resulting image can be fixed in plain hypo for further image permanence this can further lighten the print and change colour.


My personal preference is for the plum colour, and I have scanned the image straight out of the frame to keep a digital record.


Many people have suggested to me that gold toning will give a cooler brown result and I'll probably have a play with that.

It should be noted that since I bought this paper that Kenmere have discontued it, if you would like to try it you'll have to make your own paper or try the similar modus of cyanotype like papers made by this toy company I feel another blog post coming on....

Wednesday, June 30, 2010

Early Kodachrome film test

The following is an amazing test of Kodachrome colour movie film from 1922, of course its silent but quite beautiful.
This test predates the commercial introduction of the film by about 12 years, and is possibly the earliest colour movie film-certainly the earliest I've seen.
Later this year Kodachrome will be no more, thank you Kodak for the wonderful historic emulsion, I'm glad I got to shoot it.
Enjoy the film.

Thursday, June 10, 2010

My Penultimate Kodachrome Roll

After Kodak anounced that they were deleting kodachrome I had three rolls in my fridge. I had all sorts of ideas about grand last projects but in the end I gave one roll to a friend who hadn't used the film before and shot one roll on the spring flowers and my children.

Here are some of the shots from that roll.


All of the above were taken on a Nikkormat FT2 with 50mm Nikkor H and 55mm Nikkor Micro.
I just posted off my last roll which I shot at the beach, it felt strange to post the last yellow mailer (in Europe Kodachrome has mailers which go to Switzerland) Kodachrome was the first colour film I shot and I have hundreds of little yellow boxes, I feel happy that the last roll was of my children.

Wednesday, February 17, 2010

Kodak Release Ektar in Sheet sizes


Kodak have recently announced that they will introduce a 4x5 and 8x10 sheet film size of their popular Ektar 100 emulsion.

Now large-format photographers will be able to enjoy the impact and flexibility that EKTAR 100 brings. With ultra-vivid color and ultra-fine grain, it's the ideal choice for creating high magnification enlargements for commercial display.

It will be available in April.


Sunday, November 22, 2009

Adjacency effects in B&W film development

There are many types of density anomalies that can be recorded in the silver photographic image, flare and other optical chain faults, as well as turbidity within the photographic emulsion during exposure. This article concerns itself with a group of anomalies that occur during processing, these are commonly referred to as adjacency effects.


The image above is a small section of a lens test chart, when photographed on B&W film the transition from black to white can be represented by a square wave form thus:


Obviously the representation above is what would be recorded by the film in ideal circumstances, in reality the action of the developer causes a peak (A) and a trough (B)


These density anomalies happen during development, at the border of a high/low density areas where the exposed part of the film diffuses bromide (which is a byproduct of development) into the lower density region causing a trough to form (B) as the bromide has a retarding action.
The developer is exhausted in the area of greater exposure causing developer to leech from the lower density area to the higher one, this causes a peak to form (A)
The enhancement of density at the edge of the dense area is known as the border effect the depression at the bottom is called the fringe effect.
Together they form edge effects seen in prints that are known as Mackie lines.

The figure above shows that the increase in density becomes greater as the lines on the chart decrease in size, this is known as the Eberhard effect.
Strangely this effect slows at around 0.1mm and then from that point decreases.
As the lines decrease further the area between them is retarded with respect to the rest of the image and this produces a lower density that is known as the Kostinsky effect.
Studies have concluded that adjacency effects occur with all developer types and that in practice there is little difference between them.
It should be noted that agitation (or rather a lack of or reduced agitation) can make a difference. It has been reported by some users of Rodinal that using the developer at high dilutions combined with minimal agitation can result in increased edge effects.
These are probably produced by macro bromide effects as bromide is the main cause of developer retardation and a byproduct of the development process.

© Photo Utopia 2009

Friday, October 30, 2009

Rolleiflex 3,5F


Last year I bought a Rolleiflex T and re-acquainted myself with using a TLR and although not the perfect camera (what is)? it is one that works well for me with my style, I like square images and find composing in that format helps me to find a focal point.
The first TLR I used was a 3.5F with a Schneider Xenotar lens, which at the was the company 'training' camera, most of the photographers used Hasselblads because of the inter-changeable backs and lenses, the TLRs were considered 'learner' cameras.
So here am I twenty plus years later finally investing in what most see as one of the classic TLRs.
Xentotar vs Planar
The Rollei TLR during its long history was supplied with either Schneider or Zeiss lenses, depending what or whose web pages you read both a claimed to be superior, I have owned a F2,8 Planar a Tessar and two Xenotar models and can comfortably say at around F11 it will be hard to tell any of them apart. Conventional wisdom has it the Xenotar is sharper in the centre while the Planar is slightly better at the edges at wider apertures.
All I can say is that all the lenses used on the Rollei are excellent, quite capable of producing stunning results.

Operation and comparison with my Rolleiflex T
The fist thing I noticed was the F is heavier than the T, and feels slightly more substantial and robust; not a great deal more but no doubt the internals gears etc are also more robust, talking with service technicians confirms this.
The thing I like least about the T is the way the shutter speeds changes, the mechanical linkage has a less 'direct' feel, sometimes I even feel a slight slippage when changing apertures/speeds.
In contrast the rotating wheel used on the F feels very positive and accurate.
This camera has a built in Selenium light meter, it still works and as such is a welcome addition but I wouldn't like to trust its accuracy for really critical work.

One of the disadvantages compared to the T (and Rolleicord) is that the F has a 'bay II' bayonet fit, this means that accessories like lens hoods and my favourite close-up lenses the Rolleinars are all much rarer and expensive.
During the first few rolls I also found another feature that I like. If you push the F&H logo on the hood then look through the eyepiece on the back of the hood you get a focus magnifier, you cant see the whole field of view and its inverted (upside down), but the focus is more accurate using this method.
Here below are a couple of shots from the Rollei on the new Ektar 100 film not for any other reason than I like the colours...

This one is against the light
Summing up I find the F an excellent camera, not as a cheap way to get into MF photography, for that I'd recommend a Rollei T or even a Rolleicord/Yashica/Autocord.
What it will bring you is a camera that in my opinion is one of the classic designs of all time, if you forced me to pick one camera to use for the rest of my life it would be this one.
© Photo Utopia 2009