Saturday, December 08, 2007

Colour Images from B&W Film

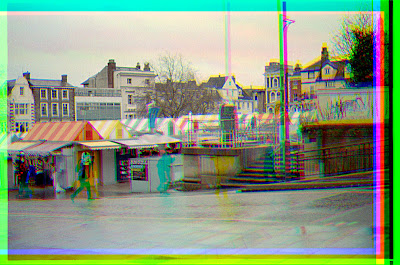
Norwich Market– B&W Tri-x-panchromatic film
What? I hear you say, surely thats the wrong way round?
No the title is correct, I'm going to demonstrate how to make your favourite monochrome film into a true colour image.

The whole idea behind this post came in a Eureka moment whilst showing a photographer the channel mixer method for obtaining better black and white from colour images in Adobe Photoshop.
Colour digital camera images are normally made up of three mono images one representing red one blue and one green. When these are combined the information makes up the colour image.

I explained to the photographer, 'each channel is rather like a b&w photo taken with either a red green or blue filter over the lens' and then it struck me I could do it the other way and use a normal mono film like say Tri-X or Ilford Delta and get colour results.

If this all sounds far fetched and you doubt my sanity (don't worry I do too) other photographers have used similar methods over 100 years ago (not with Photoshop though). One particular example is Russian photographer Sergi Prokudin-Gorskii who made some very fine colour images in the period 1905-1915.

So how is it done? how do you make colour Tri-X-Pan?

First of all you will need a red, green and blue filter to put over the lens, your favourite black and white film and possibly a tripod.

Load the film as normal, screw in the red filter and take your first shot (remember to compensate for reduced light if you are using a non TTL camera) then carefully unscrew the red and replace it with green, then repeat for the blue.
I find it easier to do in RGB order so that I can identify the frames later.

Process the film as normal, you should have three slightly different looking negs.
These now need to be scanned in greyscale, saving each image with an R or G, B so that later you can remember which one is which.

Red Filter

Green Filter

Blue Filter

The resulting files should all have exactly the same pixel dimensions i.e 3000x2000.
Next open each one of the 3 in photoshop and then with the red open click on the channels tab and select the merge channels option from the palette
The merge option wont appear if your photos don't have the same pixel dimensions.
Next the RGB option needs to be selected.
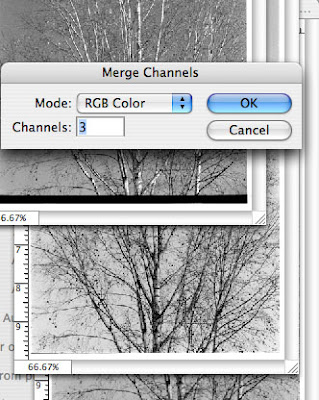

After that it will confirm the 3 images you'd like to merge.
My first result looks OK the wind moved the trees during exposure causing some 'off register' colour fringe but I think after a little more practice, possibly a tripod and no wind would yield a better result:
Ladies and gentlemen I give you colour Tri-X
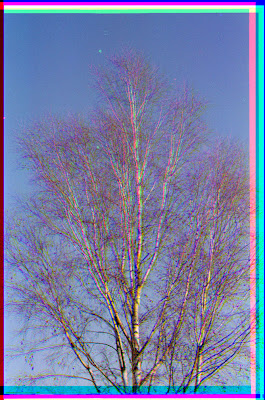

The above 'experiment' just makes me realise how good the work of Sergei Mikhailovich Prokudin-Gorskii and others that used this process really is, and I'm pretty sure that armed with a tripod and finer grained film that I'll give this another try.
Here if anyone is interested is my try on a finer grained film (Agfa APX 100) and a tripod.
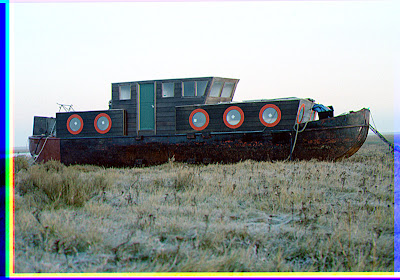

Taken just after dawn the main problem here is that slow film, little light and filters mean an exposure of 1/2 sec at F2,8
I like the shot anyhow which is of a ship used as a shed by bait diggers, I particularly like the brand new red windows which still have the retailers stickers in the centre!
And a final one closer.
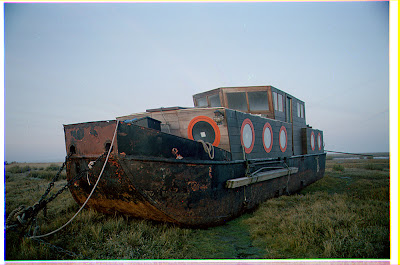
All in all an interesting process and one I shall play with in the future
EDIT: Since drafting this post I've become aware of others who are using similar techniques one such person is Henri Gaud whose blog Le blog de la Trichromie is an interesting read.
All Words and images © Mark Antony Smith

Tuesday, October 30, 2007

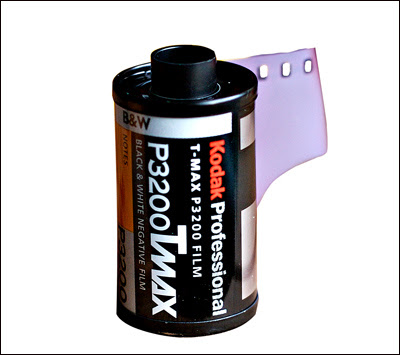
Kodak T-Max 3200

When doing the test for this film I had to make a couple of decisions, mainly because I use this film quite often for low light situations, but rarely at the box speed and also because  its one of the few films I don't care for developed in Rodinal due to its grain structure.
I personally feel rated at 1600 and developed in T-Max developer gives the best results overall with respect to shadow detail and grain.


   Above image TMZ rated at EI 1600 processed in T-Max developer

In fact Kodak state in their datasheet that TMZ can be rated between EI400 and EI 25,000 with their developers XTOL and T-Max. I can't imagine what it looks like at 25,000 but rated between 800-1600 it is good enough especially with the T-max developer, which tends to smooth grain and gives the best tonal range.

I decided to rate this film at 3200 ISO (box speed) and process in Rodinal 1:25 for 8 mins.

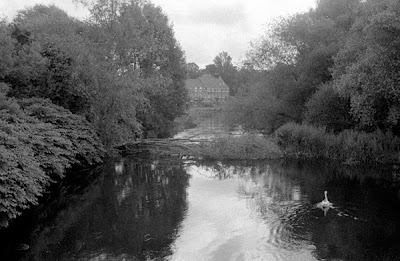
Below is a shot taken on a very dull day after a storm had brought down a tree:


There was very little light, I can't remember the exposure but I metered for the shadows in the tree on the left and closed down two stops from that reading.
The image below is a 100% crop of the shadow detail on the right hand side, and clearly shows
the cygnet riding on the mother swans back. Grain although quite visible is certainly unobtrusive considering the rated speed and developer choice.


Which brings me to what I feel is the films main weakness – its tonal range.
If I had rated it at a lower EI say 800 I'm pretty sure that both shadow detail and overall tonal graduation would have been a whole lot better, thats not to say that it performs poorly just I feel that unless you really need the extra stop you'll benefit from rating at EI 1600 or even lower, then developing accordingly.
If you need to rate this film higher then use the Kodak developers, rather than Agfa Rodinal which probably isn't the best developer for fast film.


But for those situations where you need speed or the light is low, P3200 (T-Max developer) are a pretty useful combination, although the films real speed is 1250-1600 in my opinion.
© Images and text Mark Antony Smith

Tuesday, October 09, 2007

Kodak Release New T-Max 400


The Title says it all really, Today Kodak published a press release on their website here confirming the release of the new Tmax 400, according to Kodak it is the finest grain 400 speed film in the world.
T-MAX 400 now stands alone as the world’s finest grained and the world’s sharpest 400-speed black-and-white film, offering photographers a level of clarity normally only available from a 100-speed film.

Soon as I can get my hands on some I'll do a test, I'm not sure how long until the film is at retailers, Kodak seems to say December.

One thing is for sure this is big news, especially for those who like myself love traditional photography.

Friday, October 05, 2007

Rollei 35


As you can see from the image the camera is about as tall as a 35mm film box and just over twice the width, weighs about 12oz (340g) and is of pretty high build quality certainly up there with most of the 1970's 'semi -pro' cameras like the Nikon FM, Canon A1, Olympus OM1 etc.

When the Rollei 35 was introduced in 1966 it was the smallest full frame 35mm camera in the world. However even though it is only roughly the size of two film boxes the designers still manged to design a camera that gives the user complete manual control.

The small size however leads to some design quirks especially with control placement. The film advance lever is on the left, shutter and aperture dials are on the front and the re-wind lever and flash hot-shoe are on the bottom plate.

Loading a film is done by sliding off the back and placing the cartridge in the right hand side, threading and advance are similar to other cameras.

Operation is hardly 'point and shoot' firstly the lens needs to be extended from the body and twisted to lock before use, the focus is not by a range-finder but by scale focus "guesstimate" the lightmeter on this model is always on and only turned off by putting the camera back in its case (rectified on later models) Aperture and shutter dials are twisted until the needle is aligned with a red lever.
The shutter is mechanical, and works without batteries 1/2 sec to 1/500 sec + 'B' (only down to 1/30 on Triotar model) and being a 'leaf' type flash sync is available at all speeds.
Despite its 'Quirkiness' the Rollei has a couple of strengths, firstly all manual control, secondly first rate lenses.
Lens Choices
The Rollei came with three different lenses, in order of increasing quality:
Triotar F3,5 (3 element cooke triplet)
Tessar F3,5 (4 element Zeiss classic)
Sonnar F2,8 (The Classic Zeiss design)
Actually for a short time some had a Schneider lens similar to the Tessar. 
The following are results from the Tessar

Tessar F3,5 at F11 – Fuji Neopan 400
And a 100% crop showing detail
'Yes you can have your cake and eat it Daddy'

The above shot of my daughter was shot at F3,5 and shows the Tessar to be a very good performer, with good contrast and fair sharpness even wide open, they say the Sonnar is better- that must be a very good optic indeed as the results I'm getting from the Tessar are pretty much on par with a SLR lens of the era and certainly better than most compact Point and shoot cameras.
My opinion of this camera after just a week of using is that despite some design quirks it offers a taste of true photography.
That is that it give complete control over settings (and creativity) that P&S cameras rarely give, is a full frame camera in a package that will fit it most peoples pockets, has a build quality that means it will give good service for many years.

All images and Text © Mark Antony Smith

Saturday, September 29, 2007

Adox CHS 50 ART


The Adox brand has a very long and slightly complicated history that I've already covered in my CHS 100 ART review.
CHS 50 is basically the same as KB17, I'm informed that the Adox films are the same as the EFKE emulsions that have been available for many years, in fact I have used this film many times over the past 20 years so pretty much knew what to expect. 

The above picture was taken in very bright sunlight mid afternoon and despite the fairly high contrast light the tonal values have held up well. This could be down to rating the film at 32 ISO and developing in Rodinal 1:100 for 18 mins.

The 100% crop shows a fine grain, high accutance much as you would expect from a medium/slow emulsion.


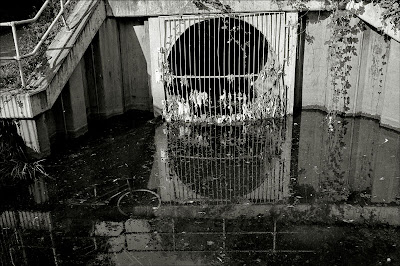
The image above shows how well the film/ developer combination handles a high contrast subject, the water was almost black with a very low reflectance, while the brick and cement was of a very high tonal value, and the film has rendered the subject very well.
I have some caveats to note with this film though, it does not like to be pushed, or under exposed and to some extent doesn't have the latitude of some modern emulsions. Also with the wrong developer can tend to be somewhat contrasty, with less shadow detail and burned out highlights.
But with care this film can deliver lovely tonal range, reasonably fine grain and high accutance overall I'd say it's probably (so far) my favourite film in the Adox range- well worth a try.

Text and Images © Mark Antony Smith

Friday, September 21, 2007

Developing Film in Coffee


Yes the title is correct, I'm going to show you how to develop an ordinary B&W film with instant coffee granules.
Here is what you need:
1 Jar of instant coffee
1 packet of washing soda crystals
Developing tank, liquid measure and thermometer.


Firstly, when you shoot the film lower the ISO by one stop, in this case I'll be using APX 100 (Jessops pan) rated at 50 ISO.
Load the film in the developing tank in the normal manner.

Next prepare the coffee developer.

5 heaped teaspoons of instant coffee (one per 2fl oz/60ml)
2 level teaspoons of Washing Soda crystals (NOT baking soda).
300ml (10 fl oz) water at roughly 25 deg C

A heaped teaspoon looks just like this

Firstly dissolve the soda crystals in the water, their purpose is to 'unlock' the developer ingredient present in the coffee granules.
Next put in your coffee, stirring well to ensure that the coffee has been dissolved fully.
You will notice that there are a few bubbles in the mixture and bubbles aren't good for development, so leave to stand for a few minutes but no longer than 10 as the mix must be used within 30 Min's.


Pour in the mixture and agitate slowly for the first minute, then tap the tank a couple of times to disloge any air bubbles.
The process time is 30 mins so its handy to have a watch, pen and paper to note the passing time.
Agitation used was one inversion every 30 seconds.

After 30 Minutes, rinse with plain water and fix in the normal manner.
Here are the negatives:

Slightly milky looking and brownish (due to staining action of developer) and also quite low contrast but certainly printable.
If you need further convincing here are some of the images.


Nice tonal detail, good grain and sharpness and although I don't think it will replace Rodinal as my main 'brew' I think you can see for yourselves that coffee is a more than capable developer.
A stimulating thought?

All Pictures and Text © Mark Antony Smith

Wednesday, September 12, 2007

1930's Voigtländer Bessa


Voigtländer have a long history producing both cameras and lenses. The company were founded in 1756 manufacturing optics and in the 1840's started making Daguerrotype cameras, so they were making cameras at the very start of the photographic industry.
The Bessa 'folding' camera was produced between 1931-49 and took 120 film, giving a negative size of either 6"x9" or with an insert 6"x4.5" there are later Bessa Models, Bessa 1 & 2 I have a review of the Bessa 1 here: Photo Utopia Bessa 1
These cameras also came with different lenses, this one has the cheapest 'Voigtar' 105mm F6.3 the better lenses were the Skopar and colour Skopar.

The framing is done by either a simple folding metal frame (seen on the right in the above photo) or by a small window from waist hight just like the Kodak Brownie.
Focusing is done with a scale, portrait, groups and landscape each marked with a red dot and also distances marked in feet.
The shutter has a very basic range of speeds 1/25 1/50 and 1/125 plus B & T. This was OK in 1930 but in these days of blisteringly fast film of up-to 400 ISO slightly restrictive.
I believe that the models fitted with the Skopar had a better shutter range.
The aperture values are F6.3- F22 which obviously helps with the slow shutter in bright light.


Above is the frame counter window, which is a simple clear red plastic the second window is for the smaller 6x4.5 size.
The film is advanced by turning a metal 'key' and there is no frame locking or winding stop, so you'll have to be careful not to double expose.


In this view we see the back open showing the spool retainer, which is quite neat making the camera pretty easy to load.


The above view is of the camera folded showing on the left the wind on 'key' and at the top right the fold down shutter release.

This type of camera can be found for very little money in thrift shops and jumble sales, and considering how well made they are (it will outlive me I'm sure) they represent a nice project.
They certainly make you slow down and think; wind on- shutter-aperture-focus and are actually great fun to use especially if you have the facility to develop your own negatives.

Above is an image taken from a roll of Fortepan 100 (formal test of that film soon) and as you can see the result is pretty acceptable considering the age of the camera and un-coated lens, certainly the 6x9 neg size helps as does the fact it was shot at F11.
In fact i like the feeling of 'antiquity' that the lens gives as its quite low contrast but detailed.
One other caveat I've found is it takes practise to fire the shutter without blur as the top speed is only 1/125 and the fold down shutter release is quite 'clunky' if I was to use this camera regularly I'd use a cable release.

Images and text © Mark Antony Smith

Wednesday, August 22, 2007

Found Film:1960's Kodak Tri-x

Next is another iconic film Kodak Tri-x-pan. I know a little more about this film, it came from a professional photographer and was shot in a 1960 Rolleiflex link
Here is the film:


I processed the film in stock ID11/D76 for 9 mins. I had some idea of the content as the photographer has written on the paper seal 'Warrington & snow scenes.


Sure enough on developing the images there were several snow scenes of a house and some shots of a seed factory.


A close up of the people and seed sacks.


The close-up shows the name of the company 'Gartons' and a google search quickly showed me that there was indeed a Gartons of Warrington seed factory, although they are no longer trading.
Here is another shot of the factory


And finally a shot of the house in the snow


Possibly the photographers house?
I think this film was shot between 1960-65, I know the camera was a 1960 F3.5 Rolleiflex and I think (though can't be sure) that Kodak stopped using metal spools for 120 in the mid '60's
© Images and text Mark Antony Smith 2007

Saturday, August 18, 2007

More found film: 1950's Adox KB17


After my successful soiree into the world of processing ancient film, a couple of people have given me some more films to try, first up is the iconic roll film Adox R17.
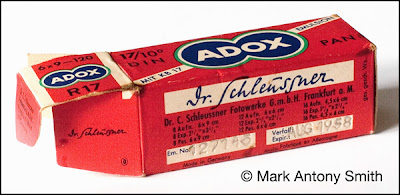
As you can see from the image above Adox still produce film and you can compare 1958 box alongside 2007 packaging.
I have blogged about the history of Adox in a previous post link  so I'll not go over that ground again here.


Inside the box the roll was wrapped in a red foil, I'm not sure if this is original, but it seems to be the correct width and colour, so I have no reason to doubt Adox used foil and the picture above is representative of the product.


Above is the roll taken out of the foil, it has a metal spool and on the backing (not visible) the word 'EXPONIERT' which means exposed in German.

I decided to process the film in Ilford ID11 at the recommended time for KB17 which is 6.5 mins.
Here are the images:


There has obviously been some slight damage from the backing paper over the last 50 years, but overall these images are surprisingly good.

They definitely come from the correct timeframe for the film which was dated AUG 1958, judging from the clothes.

From this shot a calendar can be seen, the date March 1958


A window view, clearly England, I'll try to find out where and who these people are.
More to follow....
© Images and text Mark Antony Smith 2007